In this image, I wanted to create as close to an "ideal" view of Mary while keeping it realistic. Here's where I ended up:
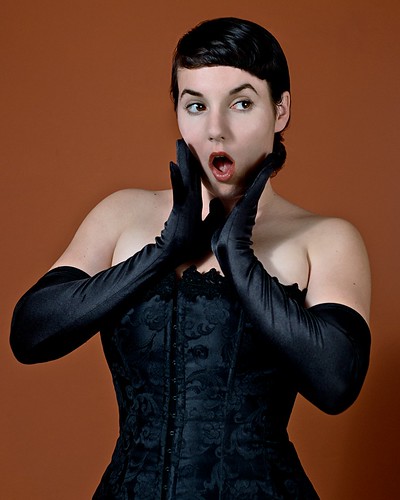
And here's where I started:

Mary and I threw this shot together at the very last minute one evening while I was visiting, so we really didn't have time to get her makeup or hair perfect. Also, she was a bit under the weather, so it was impossible to directly capture her usual adorable self on camera. But, we still ended up with some great poses and expressions, and some simple touchups brought the image back up to her full beauty.
First, I grabbed the liquify tool and brought in her waist a bit. I wanted to enhance the corset look, since when we took the photo it wasn't fully cinched due to her being slightly sick. I then turned my efforts to making minor adjustments to her hair and skin. I cleaned up her bangs, cloned out some skin blemishes, and removed some stray hairs that were out of place.

I then duplicated the layer and applied a surface blur. This filter does a wonderful job of smoothing out low spacial contrast bits while leaving some of the high contrast items. Basically, this is a fancy way of saying it works really well on skin. The right side of the image below is from the previous step, and the right side has had the surface blur applied. I use a layer mask to smooth out only her skin, being sure to leave the lips, eyes, and eyebrows sharp. This removes a lot of the skin texture, but I fix that in the next step.

Next, I grab another copy of the pre-blurred image, and apply a high pass filter to it. The threshold is just enough to cause her skin texture to show through, without much else. This layer is then set to "soft light" mode, which is designed to darken and lighten areas based on texture in the layer. Again, I use a layer mask to selectively paint in exactly the right amount in different areas. This effectively adds back in her pours, avoiding a plastic look. In the image below, the left side is the surface blur results, and the right side has the texture added back in.

Mary's face was a bit flush that night, and she had very little makeup on, so we have a different skin tone on her face and her arms. To fix this, I used a curves and a color balance adjustment layer with a layer mask to target the face. Some very minor tweaks later, and her face now matches her arms and chest.

Next, I wanted to enhance the contours on her face much the way a professional makeup artist would have done. The general idea is that areas that slope away from the camera are made darker, and areas that point towards the camera are lighter. To do this, I make a new layer, set it to soft light mode and fill it with 50% grey. I then paint with black and white to darken and lighten areas respectively. It starts with large brush strokes, and then is blurred -- much how a makeup artist would add the pigment and then blend it in. It's relatively subtle, so I've made an animated gif below. There's the original, the enhanced, and then a view of the image with the layer set to normal mode so you can see the raw adjustments. (I apologize for the horrid colors in the animated gifs, but sadly, there's nothing that can be done)

In order to brighten up her eyes, I added a very subtle reflection to the bottom of her iris:

Lastly, I wanted her lipstick color to match the background a bit better. I copied the lips, made a new layer, and then again used a curves and color adjustment layer to tweak the color.

Finally I used a curves adjustment layer on the whole image to tone down the orange a bit and to smooth out the brightest tones:

No comments:
Post a Comment