
I went to the World Cup Freestyle Championship in Park City, Utah last night. These guys were incredible!
Saturday, January 31, 2009
Monday, January 26, 2009
Photo retouching
When working on portraits, it's often desirable to tweak the image to capture a more perfect view of the subject. Sometimes this is motivated by a desire on the part of the subject to look her best, and other times it's a desire to create an idealized view of an image the photographer has in mind. In the case of straight-up portraiture, it's usually best to keep the modifications as natural as possible, but for fashion photography, more leeway is fine.
In this image, I wanted to create as close to an "ideal" view of Mary while keeping it realistic. Here's where I ended up:
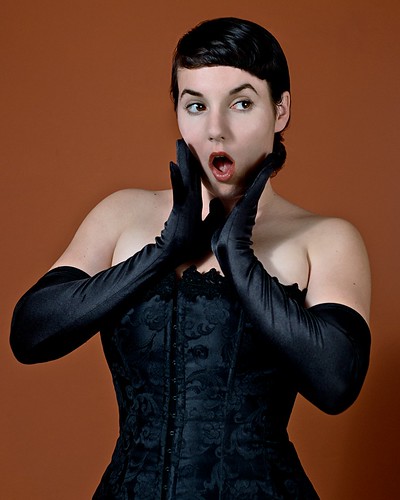
And here's where I started:

Mary and I threw this shot together at the very last minute one evening while I was visiting, so we really didn't have time to get her makeup or hair perfect. Also, she was a bit under the weather, so it was impossible to directly capture her usual adorable self on camera. But, we still ended up with some great poses and expressions, and some simple touchups brought the image back up to her full beauty.
First, I grabbed the liquify tool and brought in her waist a bit. I wanted to enhance the corset look, since when we took the photo it wasn't fully cinched due to her being slightly sick. I then turned my efforts to making minor adjustments to her hair and skin. I cleaned up her bangs, cloned out some skin blemishes, and removed some stray hairs that were out of place.

I then duplicated the layer and applied a surface blur. This filter does a wonderful job of smoothing out low spacial contrast bits while leaving some of the high contrast items. Basically, this is a fancy way of saying it works really well on skin. The right side of the image below is from the previous step, and the right side has had the surface blur applied. I use a layer mask to smooth out only her skin, being sure to leave the lips, eyes, and eyebrows sharp. This removes a lot of the skin texture, but I fix that in the next step.

Next, I grab another copy of the pre-blurred image, and apply a high pass filter to it. The threshold is just enough to cause her skin texture to show through, without much else. This layer is then set to "soft light" mode, which is designed to darken and lighten areas based on texture in the layer. Again, I use a layer mask to selectively paint in exactly the right amount in different areas. This effectively adds back in her pours, avoiding a plastic look. In the image below, the left side is the surface blur results, and the right side has the texture added back in.

Mary's face was a bit flush that night, and she had very little makeup on, so we have a different skin tone on her face and her arms. To fix this, I used a curves and a color balance adjustment layer with a layer mask to target the face. Some very minor tweaks later, and her face now matches her arms and chest.

Next, I wanted to enhance the contours on her face much the way a professional makeup artist would have done. The general idea is that areas that slope away from the camera are made darker, and areas that point towards the camera are lighter. To do this, I make a new layer, set it to soft light mode and fill it with 50% grey. I then paint with black and white to darken and lighten areas respectively. It starts with large brush strokes, and then is blurred -- much how a makeup artist would add the pigment and then blend it in. It's relatively subtle, so I've made an animated gif below. There's the original, the enhanced, and then a view of the image with the layer set to normal mode so you can see the raw adjustments. (I apologize for the horrid colors in the animated gifs, but sadly, there's nothing that can be done)

In order to brighten up her eyes, I added a very subtle reflection to the bottom of her iris:

Lastly, I wanted her lipstick color to match the background a bit better. I copied the lips, made a new layer, and then again used a curves and color adjustment layer to tweak the color.

Finally I used a curves adjustment layer on the whole image to tone down the orange a bit and to smooth out the brightest tones:
In this image, I wanted to create as close to an "ideal" view of Mary while keeping it realistic. Here's where I ended up:
And here's where I started:
Mary and I threw this shot together at the very last minute one evening while I was visiting, so we really didn't have time to get her makeup or hair perfect. Also, she was a bit under the weather, so it was impossible to directly capture her usual adorable self on camera. But, we still ended up with some great poses and expressions, and some simple touchups brought the image back up to her full beauty.
First, I grabbed the liquify tool and brought in her waist a bit. I wanted to enhance the corset look, since when we took the photo it wasn't fully cinched due to her being slightly sick. I then turned my efforts to making minor adjustments to her hair and skin. I cleaned up her bangs, cloned out some skin blemishes, and removed some stray hairs that were out of place.
I then duplicated the layer and applied a surface blur. This filter does a wonderful job of smoothing out low spacial contrast bits while leaving some of the high contrast items. Basically, this is a fancy way of saying it works really well on skin. The right side of the image below is from the previous step, and the right side has had the surface blur applied. I use a layer mask to smooth out only her skin, being sure to leave the lips, eyes, and eyebrows sharp. This removes a lot of the skin texture, but I fix that in the next step.
Next, I grab another copy of the pre-blurred image, and apply a high pass filter to it. The threshold is just enough to cause her skin texture to show through, without much else. This layer is then set to "soft light" mode, which is designed to darken and lighten areas based on texture in the layer. Again, I use a layer mask to selectively paint in exactly the right amount in different areas. This effectively adds back in her pours, avoiding a plastic look. In the image below, the left side is the surface blur results, and the right side has the texture added back in.
Mary's face was a bit flush that night, and she had very little makeup on, so we have a different skin tone on her face and her arms. To fix this, I used a curves and a color balance adjustment layer with a layer mask to target the face. Some very minor tweaks later, and her face now matches her arms and chest.
Next, I wanted to enhance the contours on her face much the way a professional makeup artist would have done. The general idea is that areas that slope away from the camera are made darker, and areas that point towards the camera are lighter. To do this, I make a new layer, set it to soft light mode and fill it with 50% grey. I then paint with black and white to darken and lighten areas respectively. It starts with large brush strokes, and then is blurred -- much how a makeup artist would add the pigment and then blend it in. It's relatively subtle, so I've made an animated gif below. There's the original, the enhanced, and then a view of the image with the layer set to normal mode so you can see the raw adjustments. (I apologize for the horrid colors in the animated gifs, but sadly, there's nothing that can be done)
In order to brighten up her eyes, I added a very subtle reflection to the bottom of her iris:
Lastly, I wanted her lipstick color to match the background a bit better. I copied the lips, made a new layer, and then again used a curves and color adjustment layer to tweak the color.
Finally I used a curves adjustment layer on the whole image to tone down the orange a bit and to smooth out the brightest tones:
Monday, January 19, 2009
Photoshop is not a dirty word.

I used to think "photoshop" was a dirty word. It was a crutch that people used when they should have just captured the image in the camera.
Now I'm pretty sure I was wrong. Photoshop is just another tool we can use to bring our vision to life. If we photographers can use polarizing filters, white balance control, creative use of dodge and burn in the darkroom, why not other more powerful adjustments?
I decided this shot could do well as day-for-night, and I thought her dress would be better if it matched the sky tones. The left side is what the camera originally captured, the right side is the photoshopped version. Yes, I probably could have captured this directly on the film, but Katie had a red dress, and I didn't think about the change until much later.
Now, Photoshop shouldn't replace basic camera skills. I still had to get the settings right to capture the original image: a strobe with 1/4 CTO (warming) gel into an umbrella high up and a bit to camera left, with the ambient about a stop or so under exposed.
However, if you get a decent image first, you can bring into Photoshop, and after some pixel pushing... voilà!
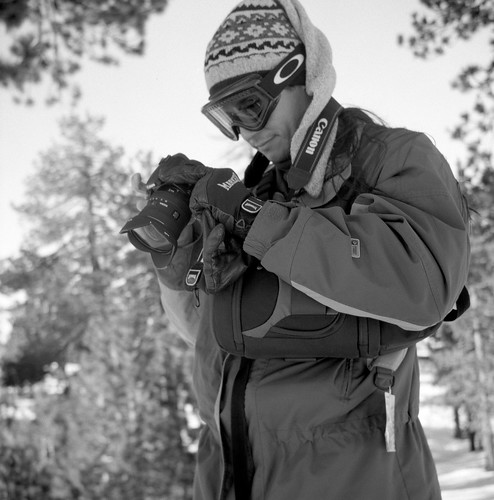
Carrying Photo Gear
I need a new camera bag. I've looked at numerous bags at a couple of different shops, but I've not found a bag that is quite right. I spent some time trying to figure out what features I would actually want in a bag and trying to analyze why I didn't like any of the bags I've seen. I now think the problem is that I have several different needs that don't mesh well. I have basically four different needs:
Trying to satisfy all of these situations is too expensive, so I need to find a way to have a bag serve multiple purposes. Since my Slingshot works well enough for the first two, I'm focused on finding a good solution for the last two. Leaving the light stand carrying method aside, I think I have these requirements:
The biggest obstacle seems to be finding one that is versatile enough that I can use it to carry both photo and personal gear on an airplane, or photo and hiking gear when on the trail. There are plenty that do either of these very well, but none that accomplish both. I'm not suggesting that I know how to fix this dilemma, because I do not. Currently, I'm considering something like the Tamrac Adventure 10 (or maybe the slightly smaller "9") which has a nice large pouch above the camera compartment for holding non-photo gear, or the Tamrac Expedition 7x, which has more padded pockets for photo gear and no non-photo pocket, but does have better external straps to hold tripods, water bottles, and the like.
My last dilemma is how to carry my lighting stands into remote locations. For places I can easily drive to, the baseball bat bag works nicely, but carrying it several miles through mountain trails is quite uncomfortable. Perhaps I could buy an old frame pack and modify it to be able to hold the stands? More research must be done here.
- Simple hiking / skiing, where my Lowepro Slingshot works very well.
- Walking to and from work, where my current pack is okay, but having a laptop holder would be nice.
- Flying to other places, where I need to bring at least one laptop, and my Slingshot doesn't help and i end up bringing a backpack as well.
- Location shoots, where I have my Slingshot, my small shoulder bag, and a baseball bat bag (for light stands), all completely full of equipment. My current setup would be fine if it weren't for the fact that I like to hike to remote locations for these shoots; the light bag is rather uncomfortable, and I'd prefer to not need to bring the shoulder bag.
Trying to satisfy all of these situations is too expensive, so I need to find a way to have a bag serve multiple purposes. Since my Slingshot works well enough for the first two, I'm focused on finding a good solution for the last two. Leaving the light stand carrying method aside, I think I have these requirements:
- Large enough to carry my Nikon D80 (and maybe my Hasselblad 500C/M), along with a few flashes, and an extra lens or two.
- Small enough to be a carry-on for air travel.
- Able to carry a 15" laptop.
- Easy to strap a water bottle to.
The biggest obstacle seems to be finding one that is versatile enough that I can use it to carry both photo and personal gear on an airplane, or photo and hiking gear when on the trail. There are plenty that do either of these very well, but none that accomplish both. I'm not suggesting that I know how to fix this dilemma, because I do not. Currently, I'm considering something like the Tamrac Adventure 10 (or maybe the slightly smaller "9") which has a nice large pouch above the camera compartment for holding non-photo gear, or the Tamrac Expedition 7x, which has more padded pockets for photo gear and no non-photo pocket, but does have better external straps to hold tripods, water bottles, and the like.
My last dilemma is how to carry my lighting stands into remote locations. For places I can easily drive to, the baseball bat bag works nicely, but carrying it several miles through mountain trails is quite uncomfortable. Perhaps I could buy an old frame pack and modify it to be able to hold the stands? More research must be done here.
Sunday, January 18, 2009
Hide and Seek

Katie and I played some hide and seek in the woods. As you can see here, she's quite good at hiding!
This is the first of several portraits from our photo shoot on the west fork of cold spring trail. We hiked down from the top of the trail and found beautiful light coming in through the trees. This was Katie's first photo shoot, and she did a great job. She had plenty of patience for my camera fiddling, and took direction very well. I'm looking forward to working with her again!
Thanks also to Sam for helping cary equipment and his role as a carbon-based voice-activated light stand!
Tuesday, January 13, 2009
Ski Waterman, Collect Light
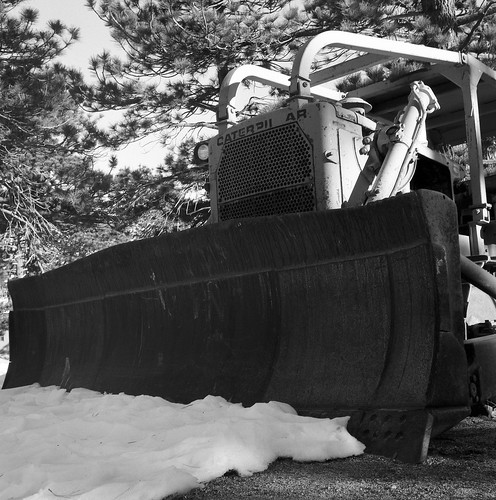
I went skiing at Mt. Waterman with Bryan on Saturday. The snow was horrendous: icy, patchy, full of death cookies. But it was fun anyway! They actually had so little snow that they didn't open on Sunday, and are waiting for the next storm.
They have this ancient Caterpillar bulldozer/plow sitting up near the top of Lift 1. I can't tell for sure if they still use it, but it is certainly well worn. Bryan thinks they bought it off John Steinbeck.
Hasselblad 12 Back

I finally fixed the old-style film back for my Hasselblad! I bought this back from my friend, but it turns out that it didn't work! He gave me a discount, and I set out to repair it. After about 10 hours over three days of fiddling with it, I finally understood how all of the gears, levers, and springs fit together, but there was one big problem: one of the springs was broken!
I ordered a replacement spring from David Odess, and it arrived today in the mail. A little less than an hour later, and I have what appears to be a fully functioning film back!
I'll see if I can finish up the roll this week and report back.
Sunday, January 11, 2009
The way of down.
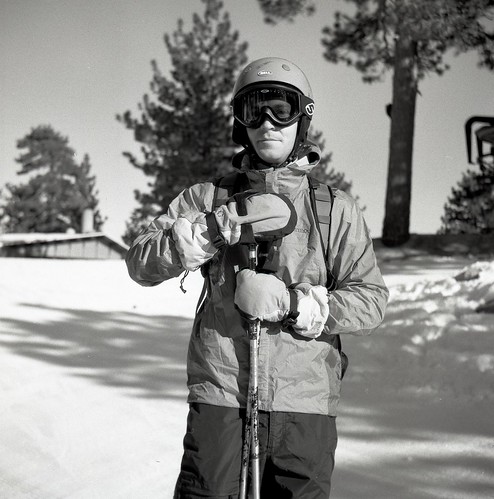
I finally got out skiing last weekend at Mount Waterman. Bryan and I bought season passes in the hopes we'll make it out at least five days. The snow wasn't great, but a bad day on the slopes is better than almost any day sitting at home.
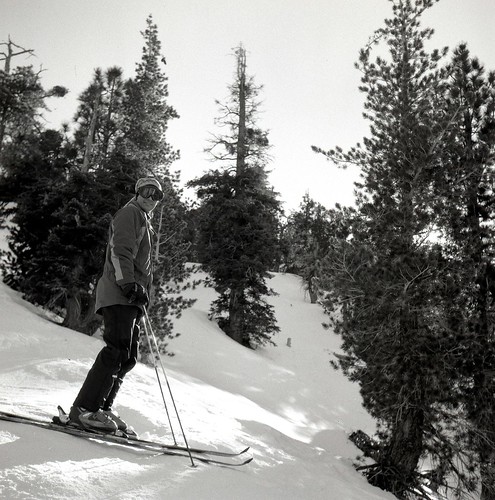
These two photos were taken on black and white film with my Lubitel 166+.
Subscribe to:
Posts (Atom)
